1.31.2011

Tea + quiet time

I love my roommates. I really, really do...but sometimes there is nothing like drinking tea, having your quiet time, and relaxing all alone. 

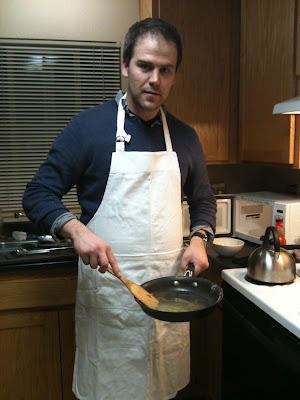
Make sure to stop by tomorrow for "What the crock?!" Tuesday. I am crocking some pumpkin butter right now, and it is taking all my will power not to keep sneaking bites. I am also, coincidentally, working on a slow cooker guest post for one of my besties, Ali's, blog Ballpoint + pen. Should be a good time with some other lovely bloggers! Don't miss it!
Love, Sav

Lovely Sunday baby shower

Today my friend Natasha and I hosted a baby shower for our sweet friend Ivy at my house. It was so much fun to plan, decorate, and throw! Here are some pictures from the day with a DIY on Thursday for the "baby girl" banner. 

 Salvaged window pane, fabric banner, and last minute Polaroid bump pics. Momma-to-be is gluten free, so the cupcakes were AMAZING gluten free cupcakes by Betty Crocker, Natasha the amazing baker that she is whipped up some delicious cream cheese frosting to go on top. And they were adorable to boot.


Loved putting my old thrifted tins to use by displaying cuties in them. Yum!

This picture does not do the mountain of gifts justice. Another salvaged window pane with mini clothespins glued on for loose cards. Vintage fabric backing added last minute because I cracked one of the glass panes by sitting on it. Whoops.

The glare was so bright my livingroom has two huge windows and other smaller window in it, my apologies.  Ivy had the genius idea of having the ladies fill out thank you card envelopes AT the shower before cards and gifts got separated.

I was going to make a banner with the baby's name on it, but Ryan and Ivy are keeping that name a secret like they are in the CIA. Baby girl was the next best thing. I originally got this DIY from Ashley Ann, It will be my feature DIY this week on Thursday. 

 
The lovely, and TINY mommy-to-be. I think she has gained like 6 pounds.


And this picture because I love that Ivy looks like she is doing acrobats. You can see some more of the mountain of gifts. She is loved and blessed.

Wonderful day, over 30 people crammed into my tiny living room, delicious food, and gift giving galore.
Love, Sav

1.28.2011

Etsy Favorites

 As I was doing my late night Etsy prowl as I creepily refer to it...I found these treasures.

Can't you just imagine going on a date in this dress?

Somebody with sewing skills please buy these!

Preach it.

Planning just got a lot more colorful!

And I am not going to leave a link for these bad boys because...I just bought them. : )
What is your all time favorite Etsy find? Mine might be these amazing mocs.

1.27.2011

Simple cake plate DIY

Y'all I slept for 13 hours last night! I had a headache the size of Texas (explains the y'all?!) when I got off work, went immediately to bed and woke up at 7 this morning. Wow. It is DIY Thursday and I have got the SIMPLEST DIY ever for you guys today, and the result are so beautiful!

 Materials
  • Glass candlestick or small glass vase
  • Large decorative dinner plate
  • Hot glue gun or ceramic glue or super glue
Are you ready for the one step? Glue the top of the candlestick or vase to the bottom of the plate (make sure to center it!) and let glue dry.
Enjoy your new beautiful and completely unique cake plate!!

You will be seeing more of the cakes plates that I have made this weekend when I do a Party Feature of my friend Ivy's baby shower. In other news...

As many of you know my poppa won Firefighter of the Year, and here are a couple pics from his awards ceremony!


When you are the crazy proud daughter that jumps in the way of the photographer to take pictures of your dad on your iphone, picture quality is the first to go, my apologies! 
Hope you all have a wonderful day!

Love, Sav

1.25.2011

What the crock?! Beef Stew

 Welcome to "What the crock?!" Tuesdays. Tonight I am going to share a delicious beef stew made in the crock pot. Greg was so anxious and excited about the new crock pot that when I showed up to pick him up for work this morning (yes, we work together too...) the stew was already done and had been slow cooking all night. Soo...so much for dinners done when you get home, we had to take the cold stew and heat up in the microwave tonight, oh well. Next time I'm crocking.
The cover looked so tasty we decided to start there!
Ingredients
6 medium yukon gold or red potatoes, quartered
4 medium carrots cut into 1 inch lengths
3 medium onions, quartered
Salt and freshly ground pepper
1 cup all-purpose flour
2 to 3 pounds beef chuck, fat trimmed and cut into 1 inch pieces (I literally used "beef for stew")
2 tbs olive oil
1 1/2 beef broth
2 tsp dried thyme leaves
2 cups frozen peas
2 cups frozen corn, defrosted

Method
Combine potatoes, onions, carrots 1 tsp of salt and 1/2 tsp of pepper into a 5-7 quart insert of a slow cooker and toss the veggies all around to evenly distribute seasonings
Add 2 tsps salt, 1 tsp pepper and the flour to a large ziplock bag and stir to combine. Add the beef to the flour mixture, seal the bag and shake to coat meat in flour.
Heat olive oil in a large skillet over high heat. Add the meat and brown on all sides, then transfer browned meat to slow cooker with the veggies.
Add the beef broth to the skillet and swish it around until the pan is deglazed. Transfer the broth into the slow cooker and add the thyme. Cover and cook for 8 hours on low until meat is tender.
Add the peas and corn and cook for an additional 1 hour. Season as needed with more salt and pepper.

Enjoy your winter time comfort food!

Greg getting his de-glaze on

Salt disaster

Crock pot of love.


Love, Sav

New Features!

I have a couple new features comin' atcha in the next couple of weeks! My wonderful BF just bought a crockpot cookbook because he was just given one by my parent's when they got a new one. (They didn't think to maybe, I dunno...give it to their DAUGHTER!) ; )


So for the rest of winter, until March 1st I will be having "What in the Crock?! Tuesdays" with recipes for  everything from Beef Stew (tomorrow) to pumpkin butter. I'll think of a new cooking series for Spring.

Another feature I am having will be DIY projects once a week. I have been pretty sporadic with DIY projects, throwing them all out at once, but now I can just hit you with one a week. So follow me every Thursday if you are interested in handmade goodies! From practical to decorative, I'll do it all!
Love, Sav

1.24.2011

New blog button

Here is my new blog button design. What do you think? I'm likin it. 
Let's see if I can get it to work now...

Love, Sav

1.23.2011

Let there be smores and lots of em!


Sooo I had a ladies craft day today at mi casa and got this crazy idea that a firepit needed to be built in my backyard ASAP. The weather is tricking me into thinking it is May and that I am WAY behind on my backyard upkeep and  necessary summer BBQ needs. Boy will I be disappointed when it starts acting like the right season again. 

We had to cut down a tree in the backyard, so we have an obscene amount of firewood and cool stump stools. That is an amazing alliteration. Stump Stools.
We got the bricks at Friedman's Home Improvement for 25 cents each. Wheelin' deal.

Firepit:Check. Bring on the Mallows.


Love, Sav

1.22.2011

Indie pizza party

So I guess I thought my hipstatic camera would be the correct choice for EVERY picture I took tonight...my apologies. In other news we love our friends natasha and Chad! They invite us over all the time, make us delicious food and watch movies with us.

 They set out a make your own pizza bar, with lots of yummy toppings, a homemade pizza sauce and of course cheese! : )


My boy Greg and Natasha's hubby Chad
I forgot to take a picture of the hostess and me...too busy eating pizza I guess. Thanks guys!

1.19.2011

Bibliophiles beware...DIY vintage book collage

I LOVE books, but I also love making art out of them. Sorry. If tearing pages out of books makes you squeamish, look away now. If it makes it any better I try to find really boring looking vintage books to rip up, I would never rip up my copy of A Tale of Two Cities, or Robinson Crusoe.


Materials
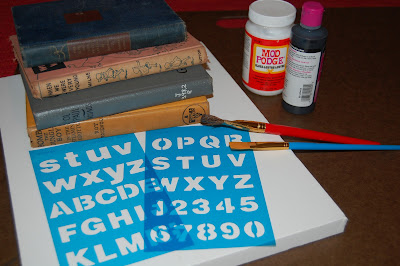
  1. Vintage books (if this idea TOTALLY kills you you can use anything and then just tea stain it to look old), old hymnals, or sheets of music
  2. Mod Podge
  3. Paint
  4. Stencils (or you can free hand it and be WAY more artistic than me!) I use the helvetica stencils from Michaels
  5. Paintbrush
  6. Canvas
  7. Old magazines (I use Anthropologie magazine)
First rip out all the pages you are going to use and start to arrange them how you want them on your canvas

Once you have an idea where everything is going, start with your bottom piece and Mod Podge away. Spread a thin layer of Mod Podge on the canvas where your book page is going and flatten the page to the canvas. If you are not careful you will get air bubbles, so make sure to go slow and flatten all the way.

When you have Mod Podged the whole thing to the canvas spread a generous amount of Mod Podge over the whole thing to really seal it in and stick it down. It dries clear, but make sure there is an even amount all the way around. **Let dry completely. I let mine dry all night**


At this point I cut out  some decorative elements out of some Anthropologie catalogs.

It is now time to stencil (or free hand you lucky artistic folks!) whatever you want. I chose a bible verse for mine. Matthew 6:30.

Hang on the wall an admire your new artwork. I would have loved to use more or my Anthropologie cut outs, but the verse was pretty long!


Love, Sav

1.18.2011

Wall Art 2

This is hanging in my kitchen, along with similar prints of a kitchen scale and coffee cup and saucer

 I love wall art. I am always on the look out for fun and interesting pieces to put on my wall. I have prints, and letterpress, handmade, and photographs. I search at thrift stores, on Etsy, and get inspiration from blogs.


This is hanging in my bedroom, it makes me happy when I come home from work.


 This is seriously my favorite piece of art I have in my home. It is quirky and weird and fits me so well!

I handmade this canvas using vintage book pages, Mod Podge, I have yet to decide if I am going to paint something on top of it. (Sorry for the horrible picture...forgive me!)
I am working on this frame collage as we speak, trying to add more variety. I am liking it so far. : )
There you have it...my wall art. Tomorrow I will be featuring a DIY for making your very own canvas mod podge collage. See you then!

Love, Sav

For the love of wall art.

If this picture confuses you, check back tonight to see and hear about the other wall art in my home!


I love wall art. Especially bold letterpress and handmade stuff. I have a treat for you tonight so check back, you will see some of my favorite artwork from my home and learn how to make your own!

 Love, Sav

1.15.2011

DIY vintage fabric teething rings

  
One of my BFFs is pregnant so I get to play the crazy crafty pseudo-aunt that makes all the homemade stuff for the baby. This is kind of like those cloth teething necklaces you can buy, but not so embarrassing to own. 
Materials
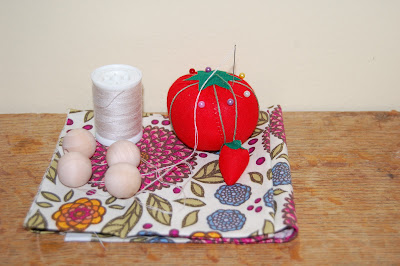
  1. Cloth (I got the "fat quarters" from Beverly's...I love the vintage pattern!)
  2. Wooden bead, large sized
  3. Scissors (not pictured...sorry I forgot!)
  4. Sewing machine or needle and thread
  5. Pins


First cut a large strip off of the fabric you have


 Then fold it once, not quite half way...
Then fold it again.

Make sure to measure and have enough room to drop the wooden bead in.


now pin and sew that baby together down the side! If you are unlucky like me and have a broken sewing machine, you can sew it by hand.

When it is all sewed down the side flip it inside out.

Drop beads down through the hole at the top, and tie a knot right above it. For extra security you can sew in between each bead before you tie it so the baby can't chew the bead out. Repeat until you have just enough room at the top to sew to the other end.
Enjoy your new vintage inspired, DIY baby teething rings. Your baby will enjoy them too. : )