12.25.2011
12.24.2011
12.22.2011
DIY vintage inspired painted tray
I am so excited to share this DIY with you!
It was super-duper fun to make and I am giving it as a Christmas present.
Supplies
1. Wooden candle or breakfast tray
2. stencils
3. paint + paintbrush
This is how the tray started out...so cheesy! Haha I got it for $3 in the bargain bin at our local Christian bookstore
Give it a nice base coat. I used white + a couple dots of "cocoa"
Don't do this unless you want paint in your coffee..whoops.
Wait until the paint dries completely!! I know I get impatient too, but watch something on netflix while it dries...it helps. Or start another project in the meantime...I mean I don't do that Greg...you know I only do one project at once and ALWAYS clean up after myself. *wink*
{I used the Martha Stewart Stencils again - find them here}
My finished stencil. Vintage inspired flowers.
I like the yellow dots I added. No I didn't free hand them...I free hand nothing, they were also a stencil
*shame*
I want to keep it. I love it. But alas one lucky lady in my life will be receiving it for Christmas.
I am not in a very giving spirit today. I went to the GAP and bought some stuff (thank daddio!) and the cashier asked me "will you be needing a gift receipt today?"
Sheepishly I answer..."oh, yeah no...these are for me"
Only TWO more days til Christmas...I can hardly contain my excitment!!
12.21.2011
Homemade Frozen Burritos
So I try to make Greg's lunch whenever he needs it (his work provides it 2 days a week)
but with my crazy school hours (waking up at 5am a-thank you) and struggling to make "unique" and "healthy" lunches everyday I have to get creative some times!
So today I made some burritos to freeze that Greg can just toss in the microwave at work
And at around 200 calories each they are way better for you then the frozen ones from the store, which can be almost 500 calories for one tiny burrito!
Ingredients
1. Medium to large Tortillas
2. Fat-Free "traditional" beans
3. 1/2 cup shredded Jack
1/2 cup shredded cheddar
4. Hot sauce or salsa
5. 1/4 cup chopped onion
Since beans are generally pretty bland I added some generous shakes of old Cholula (mi favrito hot sauce!) and a 1/4 cup chopped onions
Spoon beans and cheese into the tortilla, leaving a lot of tortilla around the edges for a good, compact burrito fold.
Wrap that baby up! I am not gonna lie I wrap a burrito better than a 17 year-old Taco Bell employee...let me show you...
A.
fold two sides in over the beans and cheese
B.
now fold one of the un-folded sides over the beans and tuck in to the fold you make previous
C.
Now roll it up and flip it over so it doesn't come apart!
Whew...that was hard...like rocket science...wait, what?
aren't you glad I had a tutorial? ; )
Now individually wrap each burrito in saran wrap and place them all into a freezer sized storagebag
Don't forget to label and date them!
I am not sure how long they will last in the freezer...but I assure you I will never find out, my hubby will be eating all of these in the next week and a half I am sure!
Enjoy those yummy little burritos...so easy!
12.20.2011
{Renegade Craft Fair 2011}
I have to admit...I had never been to a Renegade Craft Fair before, something has always come up that has prevented me from going...
Like work, or you know my bridal shower
But this year I went, and boy was I happy I did!
I was way to excited to take decent pictures so forgive me in advance.
There were so many people there...and so many lovelies to see! I had to do a lap just to take in everything before I even decided to buy anything
Greg say tons of things he wanted to too, mostly made out of wood and leather. He saw some amazing t-shirts too.
He is so much taller than me I love it!
Cute sign by the photo booth! So many people in line we never got to get our pictures taken! : (
Moleskin notebook holders
So many gorgeous prints!
So here is what I ended up coming home with. Believe me there were TONS of things I wanted, but we couldn't really afford even $15 worth of stuff since we drove an 1 1/2 to even get there
We have a "nautical" wall in our house so I am going to frame it and stick it up there with the rest
It was right in my price range ($10 woot woot) and a perfect print to remember my fabulous time in the city!
Thank you Renegade see you in the summer time!
12.19.2011
Follow me to Living Loved...
Hello lovely readers! Follow me on over to
Where I am guest posting today
A day in the life of me!
Thanks for having me Lauren!
Smith & Daphne guest post - and a cliff hanger...
We have the lovely Kristen here from {Smith & Daphne} giving us a tree topper (That will blow your mind!) tutorial.
She is a "for real" friend too, and she is amazingly talented, she always wear these beautiful handmade dresses to church, and I have to remind myself I am at church and to not covet them.
Here's the catch...the final step is on her blog so be sure to check that out at the end!
{---------------------------------------------------------------------------------------------}
Although my husband and I have been married for 6 years, last year was the first year we had a tree since we were always out of state for Christmas. I pulled together a few ornaments and lights, but there was no tree topper... This year? I made one.
I started folding paper and ended up making several round layers, each created differently. This isn't difficult to make, but it can be a little time-consuming. You can make this much simpler by just choosing one folded circle, or mixing them differently... it's easy to customize. My tree topper has 3 main layers, but technically there are about 9 in there if you count everything - so feel free to leave any of those out! I'll explain the first two now. This is my final product:
{ok, Savannah here: Isn't it great?!}
Well start from the inside and work out...
The first layer is made with an accordion fold, back and forth like you're making a fan. The difference is that you make every other fold on a diagonal. This turns it into a flattened out circle and lets the back peek through a little bit at the top.
Cut out two 4" strips of paper. Start with one and on the back, I marked every half-inch along the top and every 1-1/2 inches along the bottom.
Now, with the half-inch marks on the left, fold the top at the first mark. It should fold towards the front. Now you're going to match up the next 1/2 inch mark with the first 1-1/2 inch mark on the right. It will be diagonal and fold towards the back. It was easier for me to fold it towards the front so I could see the marks and then fold it backwards along that crease, but I also used a thin piece of cardboard to fold the paper over by lining it up with the marks. Keep folding it until you get to the end. Then, smooth it all out and cut the paper in half so you have two 2-inch wide strips.
After you cut in half refold each strip
I needed at least 4 thin strips to make a full circle - you'll have to play around a bit with lining each one up to make them look continuous, cutting off the ends as needed. I taped them all together on the back; you may want to use some tape (double-sided if you have it) in between the folds - you'll see where it might need to be held together. The center may not look pretty, but that's why I have a glittery circle on top.
The next layer was just a very basic accordion fold in green paper. I used 3-inch strips of paper for this, and taped the ends together until I had enough to make a circle. Then I glued it to a circle of thin cardboard - use something like a cereal box. The paper wanted to un-fold itself and flatten out, so I used paperclips to hold it together here and there toward the center; otherwise, it can be really hard to make it stay circular. I used a glue gun for all of this, but if you're really particular you may want to use regular white glue. My green circle isn't quite even, and the glue dried so quickly I couldn't really change that. It doesn't bother me, but it's something to consider.
{-----------------------------------------------------------------------------------------}
Ok...Kristen has left us on a cliff hanger.....
To see the rest of the DIY Tree Topper...go
12.16.2011
DIY gifts and a guest post!
A lot of people are afraid to give handmade gifts on account they don't want to be "that friend"
but there are tons of gifts to give that are thoughtful, simple and actually LIKED by the recipient!
I have Lauren from {LIVING LOVED} with me today all the way from Australia to share a handmade gift!
-Gift numero uno-
Hand stamped notepads
2. Card stock cut to the desired length and width
3. Stamps - letters and a design
Steps:
1. Stamp each sheet with the same pattern - I did a "to-do" list with dots down the side to write next to
2. Put the card stock in a pile with all edges aligned and put a swipe of mod podge or glue on the outside edge of the top to create a pad of paper that they can rip off to go to the next sheet
3. Put in between two heavy books until dry
4. Enjoy!
-Gift numero dos-
Lauren from {LIVING LOVED}'s Cookies in a Jar
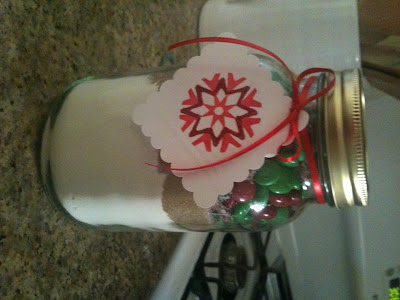
Hello! I'm Lauren from Living Loved and Savannah asked me to share something about home made gifts with you! I'm not usually that crafty... But this Christmas I've gone craft crazy (and i'm loving every minute). As gifts for my close girlfriends this year, I decided to do a little something that was both adorable and cheap to put together! I got the recipe for my 'Christmas Cookies in a Jar' from {Bakerella} and changed the m&m's and choc chips to just red and green m&ms... I then bought some cheap Christmas fabric and placed it over the top of the jar. To finish, I attached a label that said what to add to the mix before baking, to print click here and here. These were an absolute hit with my friends! :)
Bottom layer: 1 1/3 cup all purpose flour (+ 1tsp baking powder, 1tsp baking soda, & 1/4 tsp salt)
2nd layer: 1 Cup cookingoats
3rd layer: 3/4 Cup red & green M&Ms
4th layer: 1/2 brown sugar (packed)


Bottom layer: 1 1/3 cup all purpose flour (+ 1tsp baking powder, 1tsp baking soda, & 1/4 tsp salt)
2nd layer: 1 Cup cookingoats
3rd layer: 3/4 Cup red & green M&Ms
4th layer: 1/2 brown sugar (packed)
Top layer: 1/2 cup white sugar
To bake, beat butter,vanilla, & egg until combined then add dry ingredients from Jar.
Bake for 10 minuted at 350.


Here are Lauren's a-dorable labels - for those of us Americans, 115g of butter is equivalent to 3/4 Cup
In an email I jokingly told Lauren to send me a "Cookies in Jar", when lo and behold the VERY NEXT day, I received my very own from a friend...and I already made the cookies...YUM! They are good!
Different look, same great taste! The oats look like a great addition!
Thank you so much Lauren! Go check out her blog Living Loved for more inspiration!
-Gift numero tres-
The last gift is one near and dear to my heart! It can be found for sale at my new Etsy Shop
Hand stenciled tin, wood, or glass is a great handmade gift.
1. Vintage TV tray tin
2. Word stencils
3. Paint
4. Sponge brush (the best for stenciling, in my opinion)
Step 1: lay down stencil where you want them to go
Step 2: sponge paint on top of stencil
Step 3: Peel off stencils - voila!
There you go, 3 wonderfully and handmade gifts a friend would love to get! No crocheted cat sweaters or yarn doilies here!
Link up with your own homemade Christmas gifts!!
Subscribe to:
Comments (Atom)


